Thursday, September 07, 2006
Wednesday, September 06, 2006
Tuesday, September 05, 2006
Autofocus (AF) Measurement and Adjustment
- Leon Goodman's D70 AF page - good info
- Nikonian Thread D2Hs focus problems
- Nikonian thread D2h/D2x focus adjustment
Friday, September 01, 2006
Turning Pro Links
- Nikonians Pricing Calculator and Business Practices
- Nikonian threads on becoming a Pro Assistant:
- Nikonians: Selling Pictures at a Local Festival
Wednesday, August 16, 2006
Chromatic Aberration or Color Fringing Question
Taking some test shots with a Nikon D2X and Nikkor 28mm 1.4,I stumbled onto an interesting color fringing result that I'd like help understanding. Chromatic aberration occurs for the following reason according to the explanation found at http://www.paintedstork.com/digiblog/2005/07/correcting-chromatic-abberations.html:
Why does it happen?

This happens due to an optical phenomenon called chromatic aberration. Refractive index of a glass is sensitive to wavelength of the light. This means that all colors do not focus on the same plane. Violets and Reds, which are on the edge of visible spectrum would get focused at different plane than others and hence create these colored edges.
Here are some good links on CA:
- Good Nikonian Thread How to Test Lens for CA?
- Interesting CA summary from Van Walree's web site referenced by above thread: Chromatic Aberrations
Here's the situation I ran into:
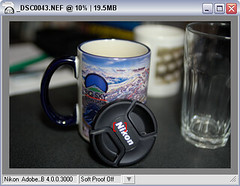
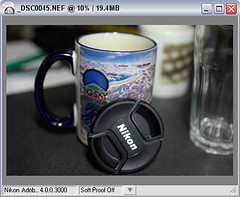
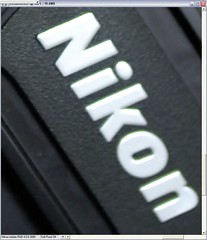
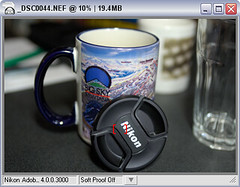
Taking some test shots of a coffee cup and lens cap I was surprised to find two identical exposures having different color fringing. I'm assuming this happened because the camera was hand held and the angle of the shot changed slightly each time.
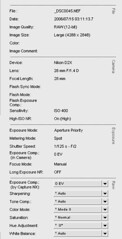
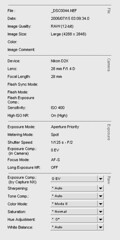
I took 3 photos (seen below). The first had the most fringing at F/1.4. The second and third taken at F/2.0 had less, but one had green fringing and the other blue.
I'd like to understand why this difference in fringe color occured on the 2nd and 3rd shots. My test shots were spontaneous and hand held, and I'm guessing that the position and angle of the lense relative to the subject and or change in focus is the cause of the color change in the fringing. The photo with green fringe (2nd below) was manually focused and not as sharp as the autofocused version with blue fringe (3rd below). Insights appreciated.
The lighting for all 3 photos was the same, desk Ott-Lite and an open window. All three photos were taken within about a 10 min span.
Thanks for your help.
August 10, 2006 Update: This question was posted at Nikonians.com on this thread. Got some good feedback there (thanks Nikonians!), one post referenced this interesting link: The Dreded Purple Fringe.
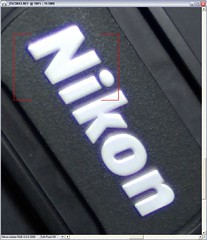
* Note: Thumbnails are 10% of original and blowups 180% of original.
|
||||||
|
||||||
|
||||||
Tuesday, August 15, 2006
Thursday, July 27, 2006
Some Panoarma Links
- Randy Forshey has some beautiful work at his web site JustShootMeStudios.com. You'll also find a cool page there shows you the kind of equipment he uses. (Thanks Randy).
- http://www.panoramas.se/index_eng.htm#
Looking into Tilt-Shift 35mm Lenses
Here's the link list so far:
- Roger Eritja's review of the Nikkor Micro 85mm f/2.8 PC lens.
- Using the 35mm Perspective Control lens (Nikkor Lenses)
- How Shift Lenses Change your Life (Photo.Net)
- Some info on the Canon TS-E 90
- Some interesting discussion on Canon lenses tahat talks about DOF issues as they relate to diffraction.
- Some more context from Luminous-Landscape on DOF, again Canon Lenses
- Nice example of the Nikkor 28 PC used to mimic 4x5 formats via Panorama at Photo.net.
- More discussion of optimal aperatures at Photo.net, Nikkor Lenses
Fabulous Ditigal Photography Tutorials
http://www.cambridgeincolour.com/tutorials.htm
This one on Diffraction & Photography caught my eye:
Diffraction Limited Photography: Pixel Size, Aperature and Airy Disks
Bob Johhnson has a great artical on Diffraction issues at EarthBoundLight.com.
Diffraction: When Smaller Apertures No Longer Mean Sharper Pictures. He mentions it on a this Nikonian post
Wednesday, July 26, 2006
When is a 200mm lens an 87mm lens?
Interesting reading at Nikonians.com:
The Nikkor 18-200 VR is a good example
And the discussion of the Nikkor 18-200 VR goes on here
The Nikkor 70-200 VR doesn't seem to have this issue
Thursday, July 20, 2006
4x5 and large format references
But 4x5s look like a great alternative for that shot which has amazing detail and unbeliveable DOF.
This 4x5 article by Ken Rockwell has definitly got me thinking. But the cost of renting a darkroom or having a lab develop the film will be a factor.
I'd like to try street shooting with a 4x5. Set it up, get your framing, focus, light readings right and ... wait for the picture, wait for the faces you want to see to walk right to you, and click, a silent, discreet little snap from the shutter cable.
It's not instantaneous, it's not high tech, but man can you imagine the beauty of those images when you get it right. It would be laborous, but it could be amazing, as evidenced by the body of work already made this way.
Wednesday, July 19, 2006
Adobe Lightroom Beta 3 for Windows
- All the sliders on the Develop panels need:
- Check box to turn off adjustment and use default value
- Plus and Minus buttons for small adjustments or make the the + and - keys do the work. Maybe Shift-+/- for bigger movements. The sliders are TOO impercise and typing in the value, too slow, because as soon as you hit enter, the focus is moved out of the box and you have to reposition to try a different value.
- I couldn't figure out how to change the image size once I'm in develop mode. I assume if I make the image smaller the adjustment time will be FASTER and I'll spend less time looking at the "Working..." message. If I take the image to 100% and only want to see 10% of it to judge the affect of the adjustment on that 10%, I would like to see the "Working..." message take only 1/10 of the time.
Lens Info
I'm looking for a portrait lens, the Zeiss ZF 85mm f1.4 is looking like a very compeling choice. Here are links I'm reviewing on the topic:
Understanding Nikon Depth of Field Lens Charts
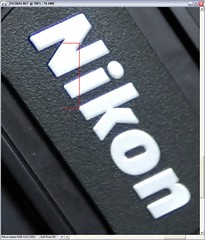
Nikkor 28mm F/1.4 DOF Chart
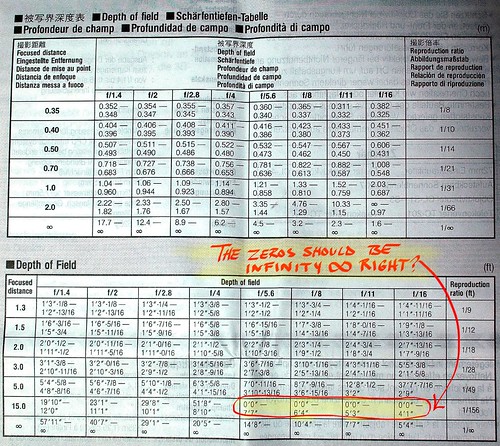
Larger Chart
Nikon Speedlight Multiple Strobe setups SB-800, SB-600
- Stobist: Lighting 101
- Nikonian Thread on strobe stands
- B&H Photoflex Umbrella Kit referenced in above thread.
- Nikonian thread on team photo with 35 people and several SB-800
- Speedlight Forum on Nikonians
- TTL vs TTL BL with wireless Nikonian thread
- Shooter who uses 10 strobes in a D1/D2 Nikonian thread on D2X back-up body
- Mike Hagen's Using the Nikon Creative Lighting System
- Flash 102: A Primer for Using Flash on a Modern SLR; By Andrew Kantor
- LumiQuest Website
- Gary Fong Lightsphere-II Cloud
- Gary Fong Lighsphere-II Clear
- Nikonians Nikon D200 and Nikon's Creative Lighting System by Digital Darrell
- Great Nikonian thread entry explaining pre-flashes and IR communication of SB-800 and SU-800.
Tuesday, July 18, 2006
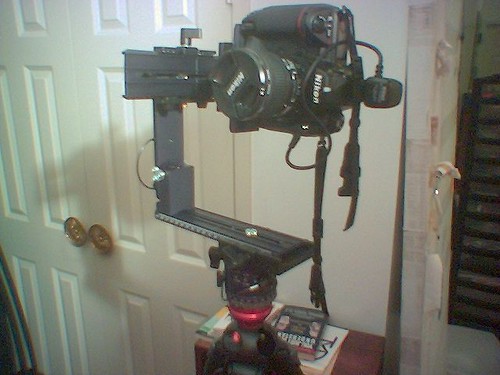
Shooting Panoramas with the Manfrotto 303SPH
I thought there must be something wrong with my Manfrotto head because it vibrates and seems flimsy to me. To my suprise the reviewer found that all of the 3 heads he reviewed exhibited "sag", which when bad enough requires the photographer to shim the camera on the bracket. It's pretty unbeliveable that you can pay so much money for a pan head and have this problem.
Really Right Stuff (RRS) has a panorama head that looks nice. I wonder if it has the sag problem
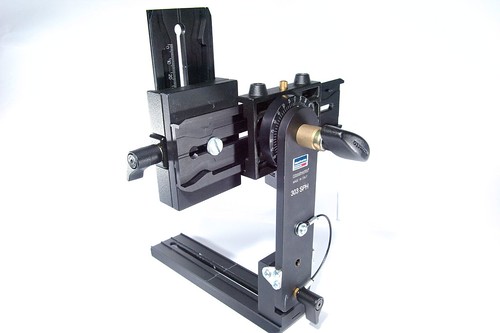
After some false starts I now understand how to setup the Manfroto 303SPH Panorama head
Here are some pictures showing how to setup the camera base plate holder:
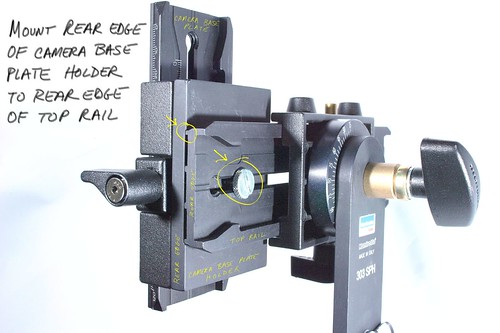
How to setup Camera Base Plate Holder - Click for Larger
Rear View of Assembly - Click for Larger
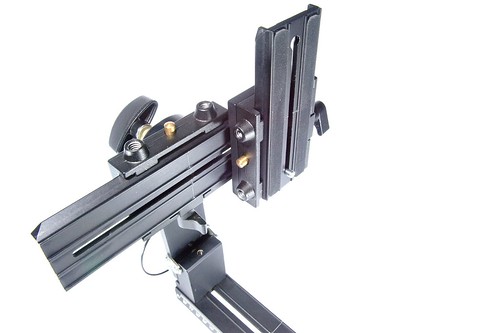
Front View of Assembly - Click for Larger
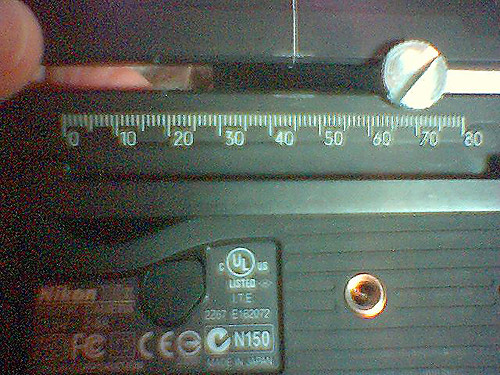
Pictures showing the base plate attached to the camera:
Notice how I've chosen to line up the white line with a line in the bottom of the body. The important thing is to remember where you line it up so that you can record the 303SPH settings for each lens used for panoramas once it's center point and nodal points are found.
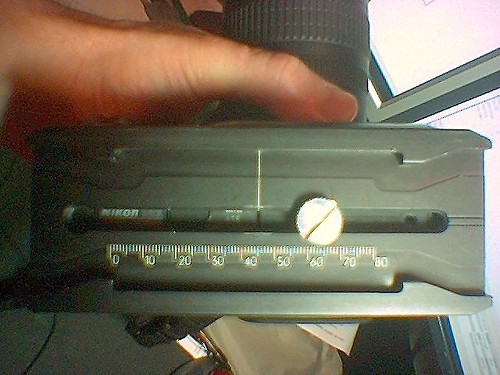
Base Plate Attached to Camera - Click for Larger View

Base Plate Attached to Camera Close Up- Click for Larger View
Pictures showing camera attached to the 303SPH:
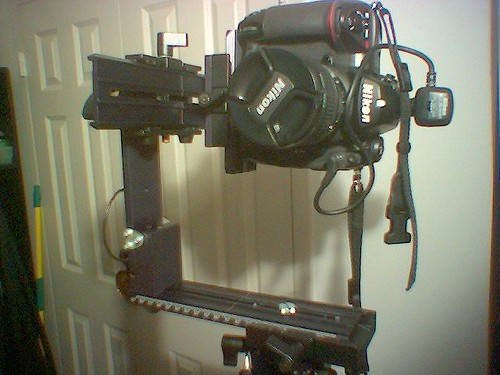
Camera Attached to 303SPH, Front View - Click for Larger
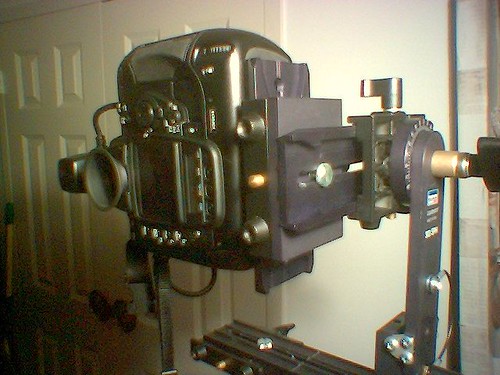
Camera Attached to 303SPH, Rear View
Camera Attached to 303SPH shows tripod head and top of legs - Click for Larger
Find and record the center and nodal point settings for each lens you want to use with your panorama head (and for zooms I believe this will be focal length specific). In addition determine the degrees you'll use in rotations in both vertical and horizontal directions.
I'm testing out my lens setups in my apartment and carefully recording the settings for each. By pretesting and recording a lens setup, time in the field can be used to focus on the shot.
Recorded settings are not helpful unless you put the 303SPH together the same way each time. The above pictures detail the head setup I use. Heres what I have so far:
- 12-24mm Nikkor f/4 DX - set to smallest focal length 12mm
- * Camera Base Plate: 52.3mm - for center point
- Top Rail (attached to camera base plate holder): 81.5mm for nodal point
- Bottom Rail (attached to head): 44mm for center point
- Horizontal Degrees: 20
- Vertical Degrees: Not Tested
- 28mm Nikkor f/1.4
- * Camera Base Plate: *needs to be remeasured* for center point
- Top Rail (attached to camera base plate holder): 73mm for nodal point
- Bottom Rail (attached to head): 49.3mm for center point
- Horizontal Degrees: 20
- Vertical Degrees: tested at 30, but had to hand set control points for 2 sets, I will test again at 20
* I align the camera base plate white line with the indentation in the bottom of the Nikon D2X body closest to the tripod mount.
Nikon D2X camera body bottom and 303SPH camera base plate, Larger View
Some Other Info:
Kekus thread on Manfrotto 303SPH compliactions
Essential Nikon D2X info AF sensors
- D2X AF Sensor size article from Nikonians
- D2X Multi-CAM 2000 Autofocus Guide from Nikonians
- Fabulous D2X info list of articles on Nikonians
- Great site with test focus charts, centered around the D70 but applicable to any camera:Tim Jackson's Nikon D70 Site
Maximize Depth of Field by focusing to the Hyperfocal Distance - essential for lenses with missing DOF scales
Fortunately I found a great hyperfocal thread on on Nikonians and feel empowered. Add to that my new Katz Eye split prism focus screen (also discovered on Nikonians), when it comes an I'll be close to having the focusing and DOF control I used to have with my old Yashica :-/ Here are some links related to this quest:
- Nikonians thread on KatzEye Optics Split-Prism focus screens for Nikon DSLR
- Nikonians Hyperfocal Thread that inspired this blog entry
- Nikonians Hyperfocal charts and tips
- Nikonians DOF & Hyperfocal Distance by J. Ramon Palacios
- Nikonians Hyperfocal Illustration
- DOFMaster - All Articles Page
- DOFMaster Hyperfocal Distance Guide
- DOFMaster FAQ incl "Cirle of Confusion
- ExpoAperture Depth of Field Guide. Advertised at DOFMaster, looks neat. Here are a couple of Google hits.
- Online DOF table from DOFMaster
- Hyperfocal Forumula Page
- EarthBound Light - Changing Focus Screns in Nikon SLR Cameras
- Nikonians Hyperfocals Table
-
Nikon knowledge database recommendation for Hyperfocal Distance Calculation
I assume Nikon intended this answer to be for film because the D2X Circle of Confusion is 0.02mm while for 35mm film it is 0.03mm to two decimal places.Topic: How can I calculate hyperfocal distance? Question My lens doesn't have depth-of-field scales. How do I calculate the hyperfocal distance? Answer For any Nikkor lens that does not have a depth-of-field scale, hyperfocal distances can be calculated manually for any focal length and aperture combination by using the formula: H = f2 / F (0.033) where "H" is the hyperfocal distance in mm, "f" is the focal length, and "F" is the aperture. For example, with a 50mm lens set at f/8, H = 50x50 / 8 x 0.033, so H is 9470mm (9.47 meters or approximately 31 feet). Setting the focus on the lens to this distance will render subjects from half this distance to infinity acceptably sharp.
Monday, July 17, 2006
Upsizing a Nikon D2X NEF; billboard, posters, high res art prints, what resolutions are required ?
These 2 goals are different in that a billboard prints needs a lower DPI than an Art Magazine. But the both have several things in common, (1) the underlying starting point is a D2X NEF, (2) they can both make you money, i.e. these are essential commercial workflows.
The published work I've done so far was only for a small magazine and newsletter, but I want to change that!
This blog entry will be updated with info and links as I find out more of the secrets of the big picture / fine art post processing.
Links so far
- Dan Heller does a great job explaining things.
- Here's one link from Nikonians which states, "Genuine Fractal is capable to upsize image up to 600%. PS7 bicubic is good for 200%. together they can produce 1200%."
-
Martin Turner clarifies the issue of billboard DPI in
this Nikonian post (Thank You). He explains that UK billboard work requires 14MP and upsizing is therefore not an issue for the kind of billboard layouts they do. Please see the thread.
Mr. Turner has provided additional details and insights on on this post - Here's a good Nikonian thread on Image Size for print sizes.
-
RIPs
- PrePressure's What is a RIP and how does it work?
- Nikonian thread on RIP Software.
- Nikonian thread on ImagePrint RIP Review.
- Printer Info
Some questions:
- Q: What is the best practice for getting to an 200% upsize? A: ?
-
Q: What are the practical limits of upsizing a D2X NEF, how big can you go?
A:
- Martin Turner provides some valuable insights on upsizing this Nikonian post.
- Here's a good Nikonian thread on Image Size for print sizes.
- Q: What resolution and DPI does a high fashion or art magazine typically require? A: ?
- Q: What workflows are required to get a NEF to a billboard? A: "The screen is usually 15 dpi, for which you need 30 ppi, or, more usually, design the board at 10% size with all pictures 300 dpi." - Martin Turner at Nikonians Mr. Turner has provided additional details and insights on on this post
Nikon D2X Resolution to DPI Chart
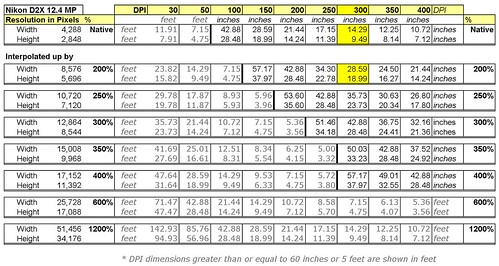
Larger Chart
More to come...
Saturday, July 15, 2006
Nikon in Camera Sharpening
Nikon in Camera Tonal Compensation
http://www.planetneil.com/nikon/custom-curves.html
Which was embedded in the following Nikonian link: http://www.nikonians.org/dcforum/DCForumID79/8.html#0